Single Sign-On (SSO)
Setup and configuration
For local development, we use
Docker Test SAML 2.0 Identity Provider, which
we have pre-configured in an idp Docker container for easy setup.
Prerequisites
- Bitwarden server set up and configured with the following server projects running:
- Identity
- API
- SSO (located at
server/bitwarden_license/src/Sso)
- Local web client running.
- An enterprise account created with the testing credit card located here: Advanced Server Setup.
Configure the IdP
-
Open your local web client and navigate to your organization → Settings → Single Sign-On.
-
Tick the "Allow SSO authentication" box.
-
Come up with and enter an SSO Identifier.
-
Select "SAML 2.0" as the SSO type. Don't save or exit this page yet, you'll need to come back to it later.
-
Open a new terminal and navigate to the
devfolder in your server repository, e.g.cd ~/Projects/server/dev -
Open your
.envfile and set the following environment variables using the "SP Entity ID" and "Assertion Consumer Service (ACS) URL" values from the SSO configuration page opened in step #4 above:IDP_SP_ENTITY_ID={SP Entity ID}
IDP_SP_ACS_URL={ACS URL}noteYou should have created this
.envfile during your initial server setup. You can refer back to the.env.examplefile if required. -
(Optional) You may generate a certificate to sign SSO requests. You can do this with a script made for your OS of choice.
# Mac
./create_certificates_mac.sh

# Windows
.\create_certificates_windows.ps1

# Linux
./create_certificates_linux.sh
Paste the thumbprint, for example
0BE8A0072214AB37C6928968752F698EEC3A68B5, into yoursecrets.jsonfile underglobalSettings>identityServer>certificateThumbprint. Update your secrets as shown here. -
Make a copy of the provided
authsources.php.examplefile, which contains the configuration for your IdP users.cp authsources.php.example authsources.phpBy default, this file has two users configured:
user1anduser2, and both have the passwordpassword. You can add or modify users by following this format, or just use the defaults. See here for more information about customizing this file. -
Start the docker container:
docker compose --profile idp up -d -
You can test your user configuration by navigating to http://localhost:8090/simplesaml and clicking Authentication → Test Configured Authentication Sources →
example-userpass. You should be able to log in with the users you’ve configured.
Configure Bitwarden
- Go back to your window with the SSO configuration page open.
- Complete the following values in the SAML Identity Provider Configuration section:
- Entity ID:
http://localhost:8090/simplesaml/saml2/idp/metadata.php - Single Sign On Service URL:
http://localhost:8090/simplesaml/saml2/idp/SSOService.php - X509 Public Certificate
- Get this by opening a new tab and navigating to the Entity ID URL above. It will open (or
download) an XML file. Copy and paste the value between the
<ds:X509Certificate>tags (it should look like a base64-encoded string).
- Get this by opening a new tab and navigating to the Entity ID URL above. It will open (or
download) an XML file. Copy and paste the value between the
- Entity ID:
- Save your SSO configuration.
Your SSO is now ready to go!
Updating the IdP configuration
Users
To add or change users, just edit authsources.php. Your changes will take effect immediately,
however any currently authenticated users will have to log out for changes to their account to take
effect.
To log out as a user, navigate to http://localhost:8090/simplesaml/module.php/core/authenticate.php?as=example-userpass and click Logout. Alternatively, you can use a private browsing session.
SAML configuration
To change the Entity ID or ACS URL, edit the .env file and then restart the Docker container:
docker compose --profile idp up -d
Troubleshooting
Bitwarden server throws “unknown userId” error
You’re missing the uid claim for the user in authsources.php.
IdP displays a "Metadata not found" error
Your Entity ID and/or ACS URL in .env are incorrect. Make sure they match the values shown in the
SSO configuration page of the Admin Console. If you change the values in .env, run the
docker compose command above to restart the container with the updated variables.
Note that the URL shown on the error page is not sourced from your .env file, so do not be
confused if the URL on the error page is correct.
Desktop client does not open correctly after SSO
The desktop client opens a browser to complete the SSO authentication flow. After you have
authenticated with the IdP, your browser will redirect to a bitwarden:// URI. This URI would
usually open the desktop client, however if your desktop client is not properly installed (e.g.
because you're running from source), this may not work. It will probably just open an empty Electron
window (or maybe the official release of the client if you have it installed).
You can work around this as follows:
- Navigate through the SSO flow until the browser window opens
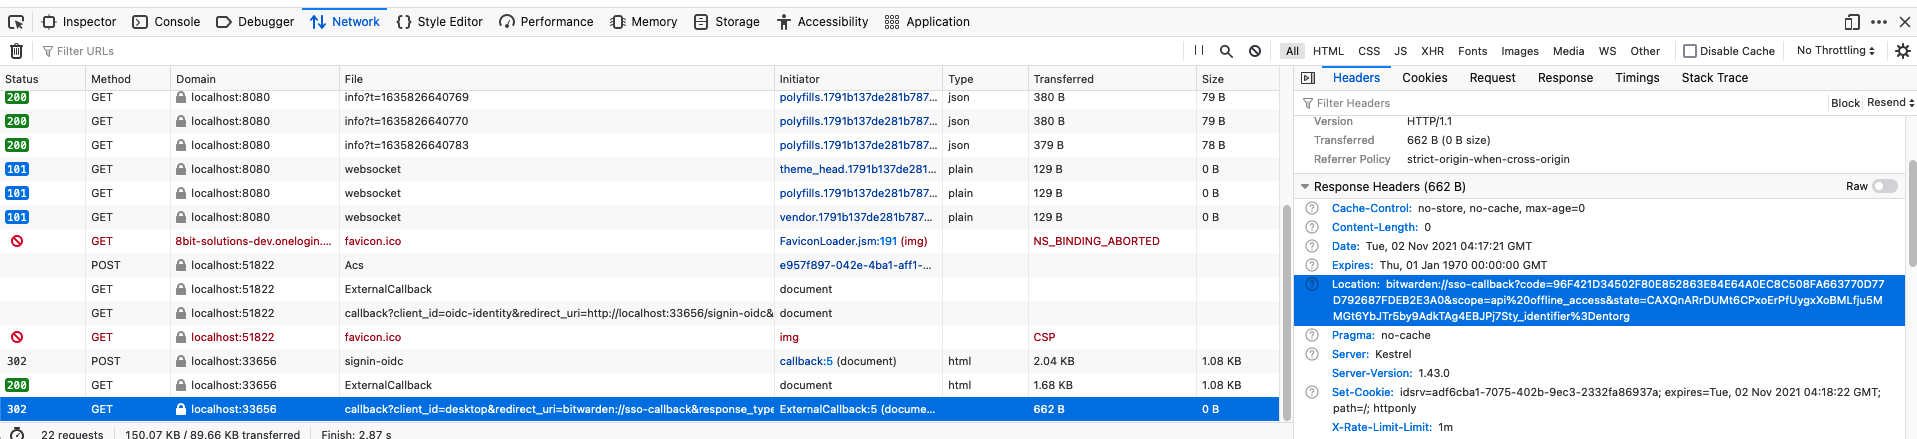
- Open the developer tools and click on the "Network" tab
- Complete the sign on with the IdP
- When the Bitwarden client fails to launch, go back to the browser and click on the last network
request. The request should have been made to
localhostand start withcallback?client_id=desktop... - Copy the
locationURI from the Response Headers. It should start withbitwarden://sso-callback?code=. Here is an example:
- Go back to your desktop client and open the developer tools.
- Paste the following command into the console and press enter:
window.location.href = '<paste the URI here>' - Your desktop client should now complete the SSO login